The Jimi Method: 6 Steps to Learning Any Song on Guitar

In this series, I will be teaching a beginner’s method of learning the guitar that changed the way I viewed the fretboard. Covering the basics, but avoiding the boring beginner BS, these lessons will provide you with the tools and know-how to instantly expand your song vocabulary tenfold.

Part 2: The Ying Yang nature of Major and Minor Chord Shapes

Still have those root notes memorized? Honestly, it’s as easy as getting a song stuck on your head then having the patience and know-how to throw it on a fretboard.

I promise that you won’t have to listen to this song ever again after this lesson, but let’s stick with Jason Mraz’s I’m Yours to build upon what we already know.

Once we understand the basic concept of applying a major or minor chord shape ‘on top’ of the root note we’ve already discovered through ear training, we can begin to easily determine chord progressions in most songs.

So let’s do that now.

Part 2: Applying Major and Minor Chord Shapes to Root Notes.

Let’s go back to that first lyric of I’m Yours and hum out the root note again, just like we did in part 1 of this series. Hold this note in your head.

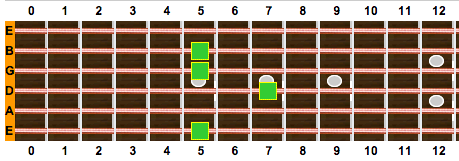
  • Match the note you’re humming with the same note on the low E-string: this process is simple enough – just pick the open low E-string and continue going up fret-by-fret until you find the right note. Sticking with I’m Yours, you’ll find the correct note when you eventually slide up to the 8th fret of the Low E-string. It’s not important for now to know what note this is.
  • Repeat the same process on the A-string: simply pluck the open a string and go up fret-by-fret until the note on the guitar matches the note you’ve been humming (or by now is imprinted into your mind). If you do this with I’m Yours, then you’ll find the correct note at the 3rd fret of the A-string.
  • Now apply the respective E-string or A-String MAJOR Chord Shape: That is, either choose the 3rd fret of the A-String, or the 8th fret of the E-string (notice that they are the same note), and apply the follow shape over top the root note:

A-String Major ShapeScreen Shot 2014-08-27 at 10.47.08 AM or : Screen Shot 2014-08-27 at 10.47.18 AM

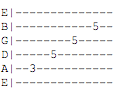
E-String Major Shape

Screen Shot 2014-08-27 at 10.48.39 AM or :Screen Shot 2014-08-27 at 10.49.53 AM

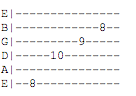
The two chords shapes above simply represent 2 ways of playing a C MAJOR BARRE CHORD. “Barre” chords contrast to open chords (i.e., the first ‘cowboy’ chords we often learn on guitar) because the shape can be moved anywhere on the fretboard. 

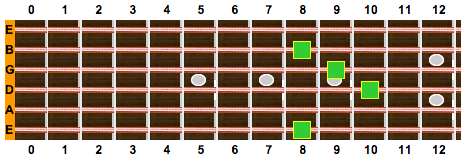
  • Repeat the above process for the other root notes in the progression: for the sake of keeping this short, the 4 root notes in order of the progression look like the following:
    • Screen Shot 2014-08-27 at 10.53.55 AM
    • We’ve already done the chord shape for the #1 chord in the progression, so let’s figure out the rest.
    • 2 – Screen Shot 2014-08-27 at 10.55.59 AM or Screen Shot 2014-08-27 at 10.56.06 AM
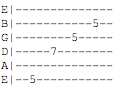
    • 3 – **NOTICE** That applying the major shape over the 5th fret root doesn’t sound quite right. This is because it’s not the same chord in the song. BUT DON’T WORRY. If the chord is not MAJOR, there is only one other possibility, namely that it is a MINOR chord.
  • The MINOR Chord Shape: Having the major shape above built into muscle memory makes learning this new shape very simple. There is only a one-note difference between major and minor chords (i.e., lowering the 3rd – don’t worry about this for now), and it looks like this when applied to barre chords:

A-string Minor Shape: Screen Shot 2014-08-27 at 11.04.45 AM or Screen Shot 2014-08-27 at 11.04.55 AM

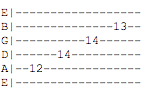
E-string Minor Shape:
Screen Shot 2014-08-27 at 11.00.38 AMor

Screen Shot 2014-08-27 at 11.00.49 AM

    • For the sake of simplicity and staying within one section of the fretboard, the obvious choice to use in this progression is the e-string root on the 5th fret, though they can be interchanged at any point as a means of improvisation and adding a little bit of ‘colour’.

Now that you know both the E-string and the A-string root barre chord shapes for both major AND minor chords, the world is yours. Seriously, though. Finding out the last chord to the progression should be easy enough without any guidance.

We know that the last chord has a root note on the 1st fret, so all that is left to do is a very simple trial and error to determine if it is a major or minor chord. This will be very obvious to your ear. Yes, you guessed right, it is a major chord!

So that’s it! You’ve just learned a song by ear!
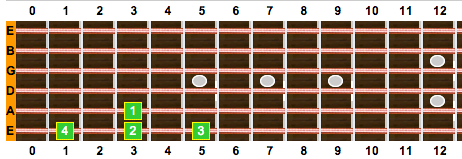
In case you’re wondering….
3rd fret of A string, major shape = C major
3rd fret of E string, major shape = G major
5th fret of E string, minor shape = A minor
1st fret of E string, major shape = F major

SO put all together, Jason Mraz’s “I’m yours” is a simple 4 chord progression of:

C – G – Am – F.

Next week we’ll build upon our knowledge of root notes and chord shapes, and consider the importance of improvising rhythms whether using a pick/plectrum or finger-picking.

Cheers,
Johnny

Part 1: Let your Ear do the Work

Hiya!

Whether you’ve never picked up a guitar before, or you’re a seasoned specialist of the six-stringed-sword, there is no skill more impressive than picking up a song on the spot and playing it by ear.

Many evenings during my childhood were spent labouring over memorizing open chords, committing major scale shapes to muscle memory, and blindly following tabs without understanding the music. Don’t get me wrong, doing these things did a lot to improve my playing, but I was limited to a small vocabulary of songs, stuck within a narrow understanding of my potential as a musician, and felt I was approaching a plateau to my learning.

I wanted to be able to play the songs that were on my ‘Recently Played’ playlist on my iPod. I wanted to be able to hear a song at a party then pick up a nearby guitar and impress all the surrounding females. I wanted the instrument to do the work for me.

Something had to give, then I came up with the Jimi Method. It works, and it’s scary how quickly it will make all your hard work and frustration with the guitar suddenly ‘click’.

Part 1: Ear Training – Why the Root Note is King, and how to find it.

The most important skill that a guitarist can have is an adept ear. Don’t let this intimidate you, because everyone has the potential to develop this skill. Let me put your concern to rest right now: no, you are not tone deaf. The most simple test to determine if you are actually clinically tone deaf is to pick up your cellphone, go to the keypad, and call home. If you can distinguish that the notes have different tones, then you can do this. I guarantee it.

  • The Root Note: What is it? Simply put, it is the lowest note in a chord that defines the name of the chord. For example, the root note in the classic cowboy G-Major chord is G, and is located on the third fret of the low E-string. There exists chords where the root note changes in the chord, but this isn’t necessary knowledge to beginning learning songs by ear.
  • Finding the Root Note: Where one begins their lifelong journey of training their ear. Let’s take a simple example that is known across most demographics: Jason Mraz’s I’m Yours. What’s the first chord? Hum it. Stop. Hold that note, and keep humming it. Lost it? Start the song over and find it again. Hum it and imprint the tone in your mind like it was a meditation mantra (you do meditate, right?). THIS is the root note, and it is the single most important first-step towards learning any new song by ear.
  • Find the Root Note of every chord in the progression: if this sounds like music-theory jargon, don’t worry. Simply repeat the process above for the 2nd, 3rd, and 4th chord. Sticking with I’m Yours, let’s consider the second chord.
    • “Well, you done done me…” = The FIRST chord (i.e., the first root note you discovered from before).
    • “I tried to be chill…” = the SECOND chord = stop and hum the bass note to this chord. That will be the root note for the second chord. So far, we’ve discovered the root notes of two chords. We don’t know how to interpret this information yet, don’t worry.
    • “I fell right through the cracks” = the THIRD chord.
    • “Now I’m trying to get back” = the FOURTH chord.
    • NOTE: If you haven’t already noticed, the ‘progression’ or ‘pattern of chords’ repeats itself after the fourth chord, and returns back to the first chord’s root note.

So what have we accomplished, how does this help us?

If you’ve followed the above lesson, you should have 4 notes in your head. At first this may seem like a lesson on how to play a Jason Mraz song, but I encourage you to take this method and apply it to a song that YOU enjoy and want to learn.

Once you’re confident that you can find the root notes of chords within a progession, you can proceed to Part Two of this series, where I discuss how to use this information within the framework of major and minor chords.

Stick with me, it’ll all ‘click’ soon.